
For a French translation, please see here…
To start with Docear as smooth as possible, we wrote this manual. It’s detailed, it’s long, it takes some time to read, but be assured that if you invest this time, you will know how to master one of the most powerful tools to manage your academic literature.
Let’s get started…
Get the idea
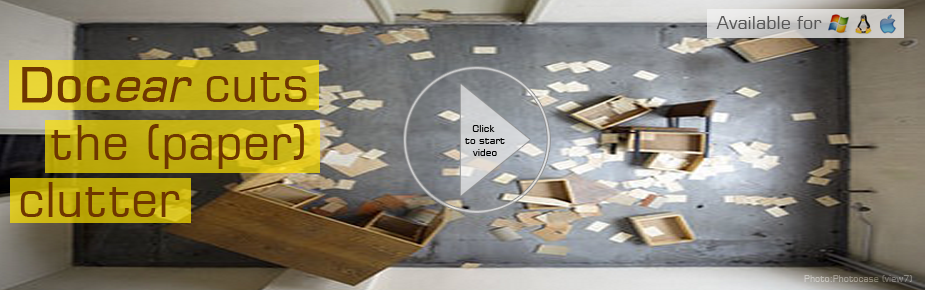
We created a teaser video that explains in 5:30 minutes what Docear can do. We highly recommend to watch it, as it gives a pretty good overview of Docears’ main ideas. If you watched the video already, go to the next chapter. If you don’t want to watch the video, or can’t, read on…
The central entities in Docear are annotations, i.e. comments, highlighted text, and bookmarks that you create in PDF files. This means, after downloading a PDF, you read it with your favorite PDF viewer and annotate anything you consider important and that you might want to look-up or cite later.

Annotations created with your favorite PDF editor
Docear imports your PDFs and annotations. You create categories reflecting your research interests, and sort your PDFs and annotations into these categories. If you want to look up some information, you click the annotation and the PDF opens at the page you created the annotation.

Research categories created by a user, and the contained PDFs and annotations
The next step is drafting your own paper, assignment, thesis, or book. To start, create a new mind map. From your previously created literature mind map you can copy all the PDFs and annotations you need.

Finally, you export your draft and do the final editing in Microsoft Word or Libre/OpenOffice.
In the following sections, we will explain everything again – in much much more detail.
Prerequisites
To use Docear, you have to meet the following prerequisites.
Operating System
Docear runs on Windows (XP, Vista, 7, 8, 10, or later), Linux, or Mac OS (10.5 or later)
Java 1.5 (or later)
Java is the programming language in which Docear (and many other programs) is written in. To run a software written in Java, you need to install the free Java Runtime Environment (Java JRE). Probably you have already installed Java. If not, and Docear does not start, visit www.java.com if you are a Linux or Windows user. Mac OS 10.6 users may download Java here, Mac OS 10.5 users here, and Mac OS 10.7 users here. Our FAQ also contains information for Mac users.
Download Docear
You always find the latest stable version at https://docear.org/software/download/. If you are more curious and want the very latest version with the latest features, try out our experimental versions.
Install Docear
Installation should be straight forward.
- Windows: double click the docear.exe file and follow the instructions on the screen
- MacOS: Start the .dmg file
- Linux: You should know how to do it 😉
First Start
Initial Settings
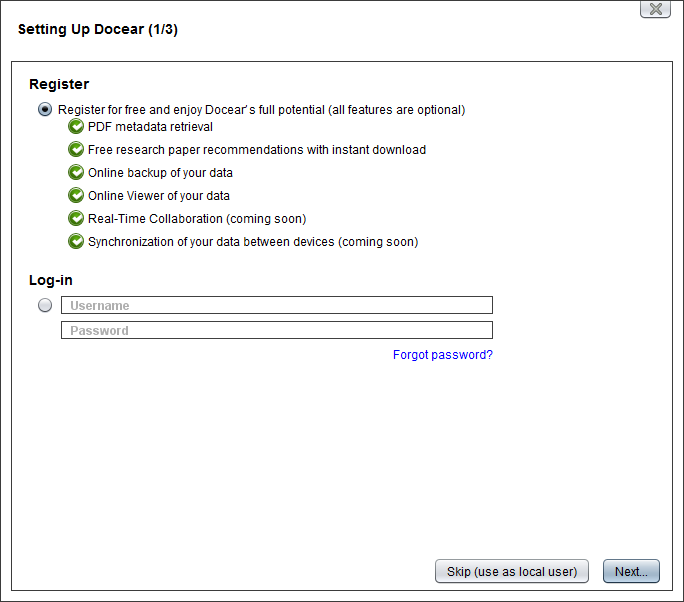
When you start Docear for the first time, you will be asked whether you want to register, log-in, or use Docear as a local user. We highly suggest to register, because it will give you many free benefits such as literature recommendations, metadata retrieval, and backup of your data. However, registration requires to provide us with your email address, and under some circumstances (e.g. if you activate recommendations), Docear will statistically analyze your mind maps. If you don’t want any data of yours to be analyzed, use Docear as ‘local user’. Please note: Currently, all online services are disabled.
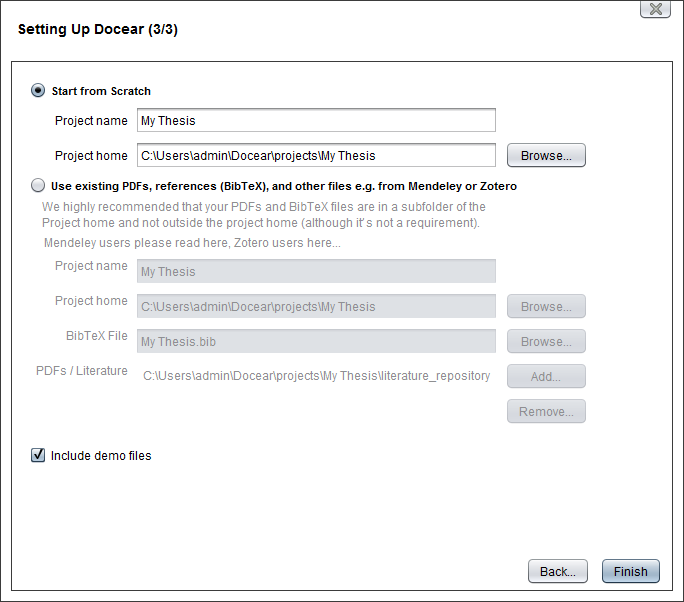
In the next step, you need to decide about where to store your data. If you are completely new to academia, and have no PDFs yet, you may start from scratch: Select a project name (e.g. “Course ABC”, “My Dissertation”, “Book XYZ”, …), and a project home. The project home is the folder that shall contain all your data including PDFs, images, Excel sheets,etc. An appropriate project home could be, for instance, “c:\University\”, or “\My Documents\Work\”, or “\Dropbox\PhD Stuff\, …
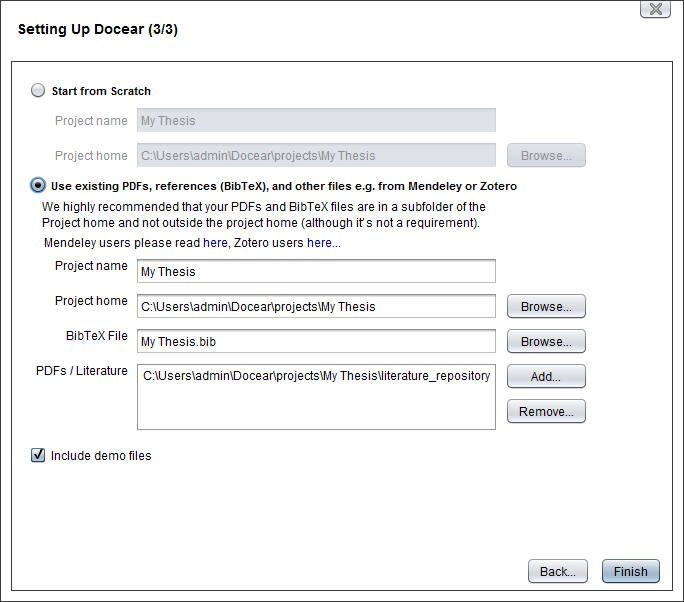
If you have already some data on your hard drive that you want to use with Docear, you need to select the second radio button. This allows you to choose a project name, your project home and the folder(s) in which you store your PDFs and BibTeX files. We highly recommend to have your PDFs and BibTeX files in a sub-folder of your project home. For instance, if your project home is c:\work\, a good place for your PDFs would be c:\work\literature\ or c:\work\pdfs\ but not c:\temp\literature\ because that wouldn’t be a subfolder of c:\work. If you want to choose a folder e.g. in your Dropbox, you can also do this. The path would be something like c:\Users\<username>\Dropbox\University\ (you shouldn’t use the entire Dropbox as your project home).
If you have been using another reference manager, read how to use Zotero and Docear or Mendeley and Docear at the same time, or how to migrate from Mendeley to Docear.
Selecting a PDF Editor
Docear will ask you which PDF editor you want to use with Docear. To enjoy Docear’s full potential it is really important that you select a PDF reader that is supported by Docear. Otherwise you won’t be able to open annotations directly on the correct page or you won’t be able to import annotations. We highly recommend PDF-XChange Viewer because it’s the only (free) PDF editor that fully supports all the features that Docear needs. However, please ensure that you download the PDF-XChange Viewer, and not the Editor. For a full overview of supported PDF viewers, read here.

The main components
You should see something like the following picture.
- The menu contains a few ribbons, each with a number of functions. We suggest, you have a quick look at the ribbons, to get a rough idea which functions there are
- The workspace panel serves as your ‘control center’. It lists all your projects (right now, it should only be one. Read the FAQ for more information about projects). Each project contains
- The Library, which contains your most important data, namely the mind maps in which you organize your papers
- The “My Drafts” folder in which you will store your drafts.
- The Literature Repository that contains your PDFs
- The Reference database, which contains the bibliographic data of your PDFs and other documents.
- The “My files” folder which gives you access to all folders and files in your project home.
- The reference panel lists your references in a table, similar to other “classic” reference managers.
- The mind map window is your primary working area. In this window, you will organize your literature, draft your own papers, and receive recommendations.
- The note-panel allows you to create additional notes. By default it’s hidden. To show it, select “View -> Elements -> Show note panel” in the menu.

To get more space for your work, you can hide and re-size all components. Just click the little triangles to hide a component. You can also press the TAB key on your keyboard, and all components will vanish. A double click on a ribbon will hide all entries in the ribbons but not the ribbons themselves.
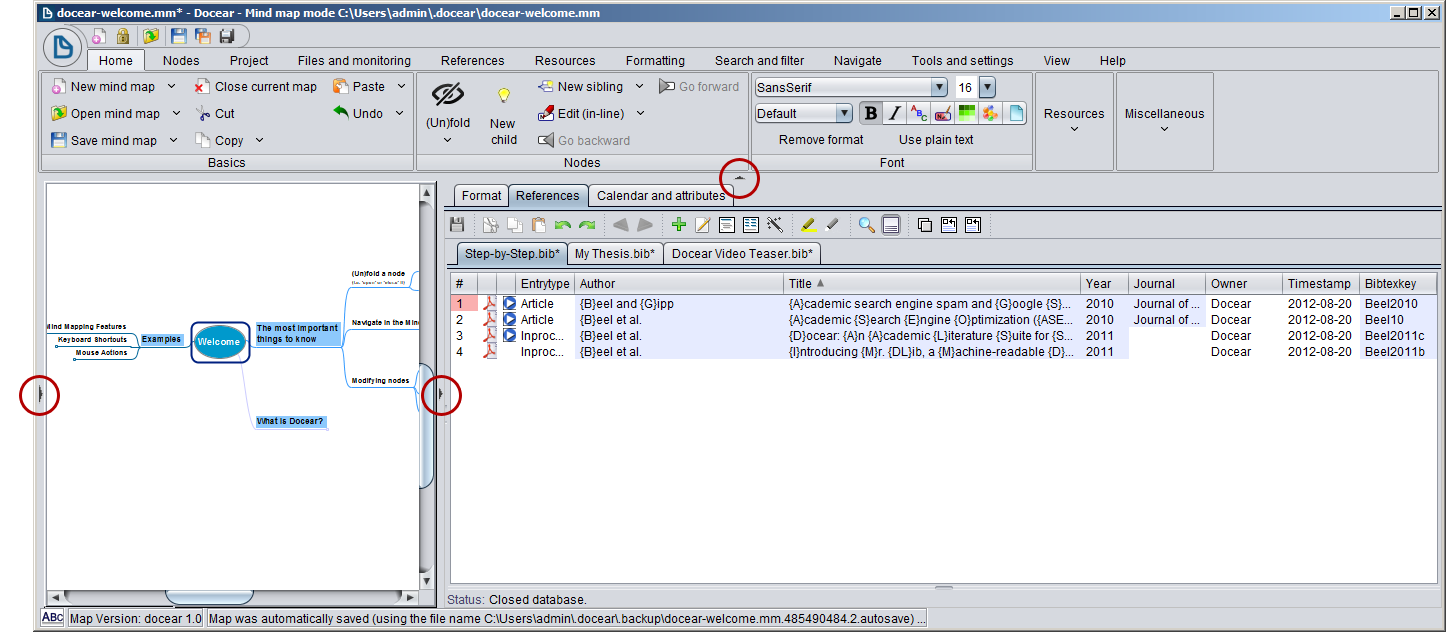
Finally, a little bit of terminology: You will be working with mind maps. Mind maps consists of ‘nodes’, and each node may contain text, images, formulas, etc. In the picture below, elements A, B, C, and D are all nodes (and all the other elements you see, are nodes as well). A is the root node of the mind map. B is a child node of A, and C is a child node of B. In other words: B is parent of C, and A is parent of B. Nodes C and D are siblings. When PDFs or annotations are imported to Docear, they are represented as nodes, too. These nodes differ from the “normal” nodes only in having an additional link to your PDF or annotation.

That’s it, you are all set, and ready to use Docear!
Organize your literature
Create new categories
You organize your literature in the “Literature & Annotations” mind map. Open the map by double clicking it in the workspace panel. Create a few categories that reflect your research interests (just create a few, it doesn’t have to be perfect). To create a new category, click on an existing node and
- start typing on your keyboard, to overwrite the existing node.
- select “New child” in the menu to create a new child node, or press the INSERT key on your keyboard.
- select “New sibling” to create a sibling node on the same level as the currently selected node. Alternatively, press ENTER on your keyboard.
- select “Edit (in-line)”, double click a node, or press F2, to edit a node in-line.
- press DEL on your keyboard to delete a node

Import your PDFs and annotations
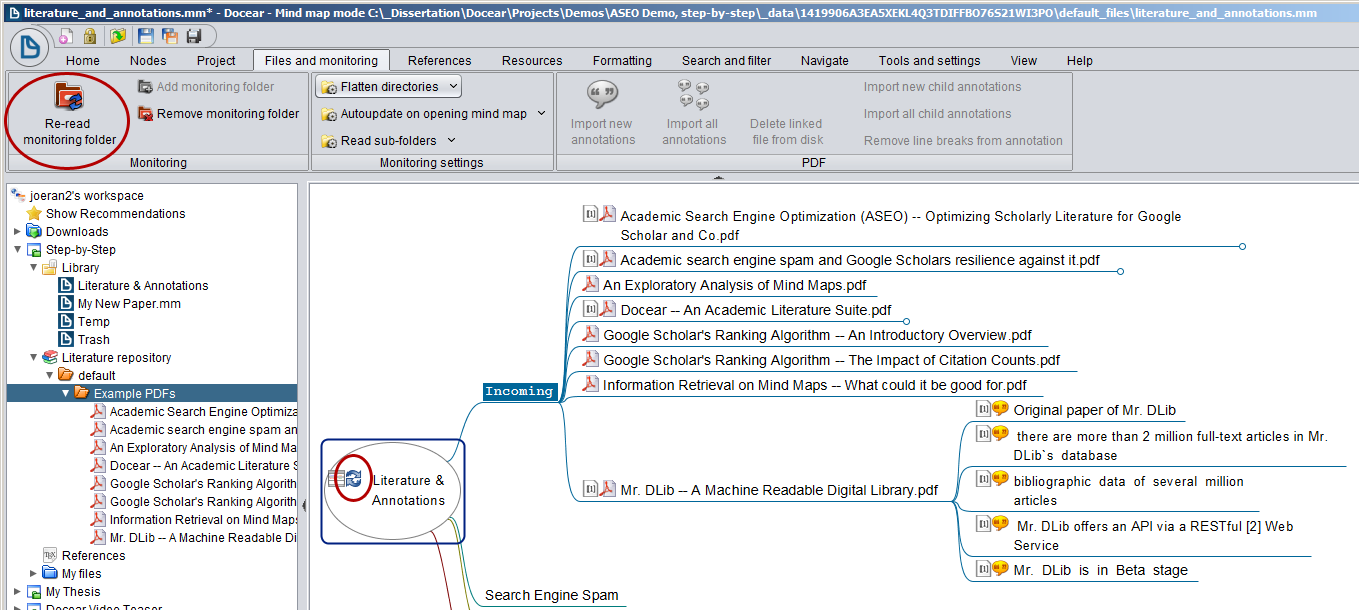
Now it’s time to get your PDFs and annotations into Docear. Ensure to have the root node selected, and chose “Re-read monitoring folder” from the menu, or click the refresh icon in the root node. This function will import all PDFs and all annotations that are stored in your literature repository but not yet in any of the library mind maps. This means, whenever you store a new PDF on your hard drive (in your literature repository), or create a new annotation in an existing PDF, Docear will check if this PDF or a annotation is already in your “Literature & Annotation” mind map (or any other mind map in your library), and if not, the PDF or annotation will be added to your “Incoming” node in the “Literature & Annotations” mind map.
Sort your PDFs and annotations
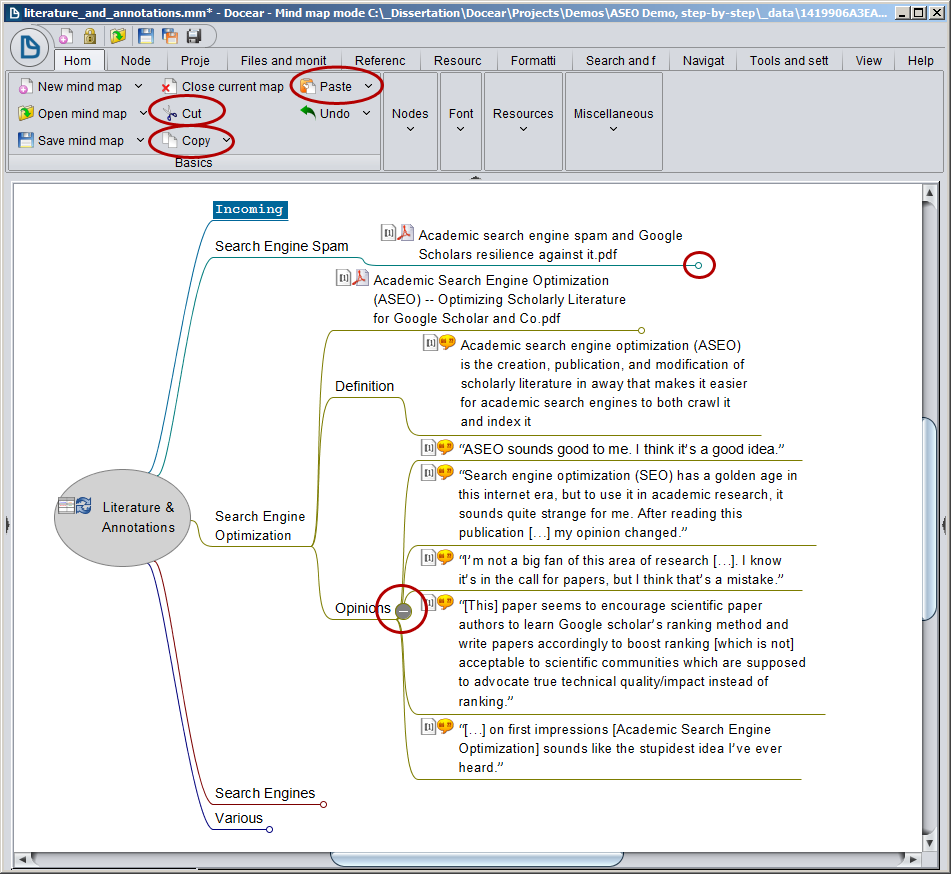
In the next step, move your PDFs and annotations into the categories: Select a PDF or annotation you want to move, cut (CTRL+X) or copy (CRTL+C) it, select another node and paste (CTRL+V) your node as child node. To keep the overview, click the little “bubble” at the end of a node in order to fold or unfold it. It’s important to note that Docear does not restrict you to moving PDFs only. You can also move single annotations to any category you like.
Alternatively to moving nodes via the menu or keyboard shortcuts, you may also move nodes via drag&drop. Click on a node, hold the mouse button pressed, and then move the selected node over any node you like. Depending on where exactly you release the mouse button, the node will be added as sibling or child node. Release the mouse button over the top of a node, and the moved node will be added as sibling (left part of the below screenshot). Release the mouse at the right corner of a node, and the node will be added as child node (right part of the screenshot).

When PDFs contain lots of information, and you create lots of comments, or highlight many text passages, you get easily lost when trying to find a certain annotation (screenshot, left). Therefore, Docear allows to create categories within PDF files. Select a PDF, insert additional child nodes for your sub-categories (e.g. “Results”, “Methodology”, …), and sort the annotations into these categories. This improves the structure of your PDFs and annotations significantly.
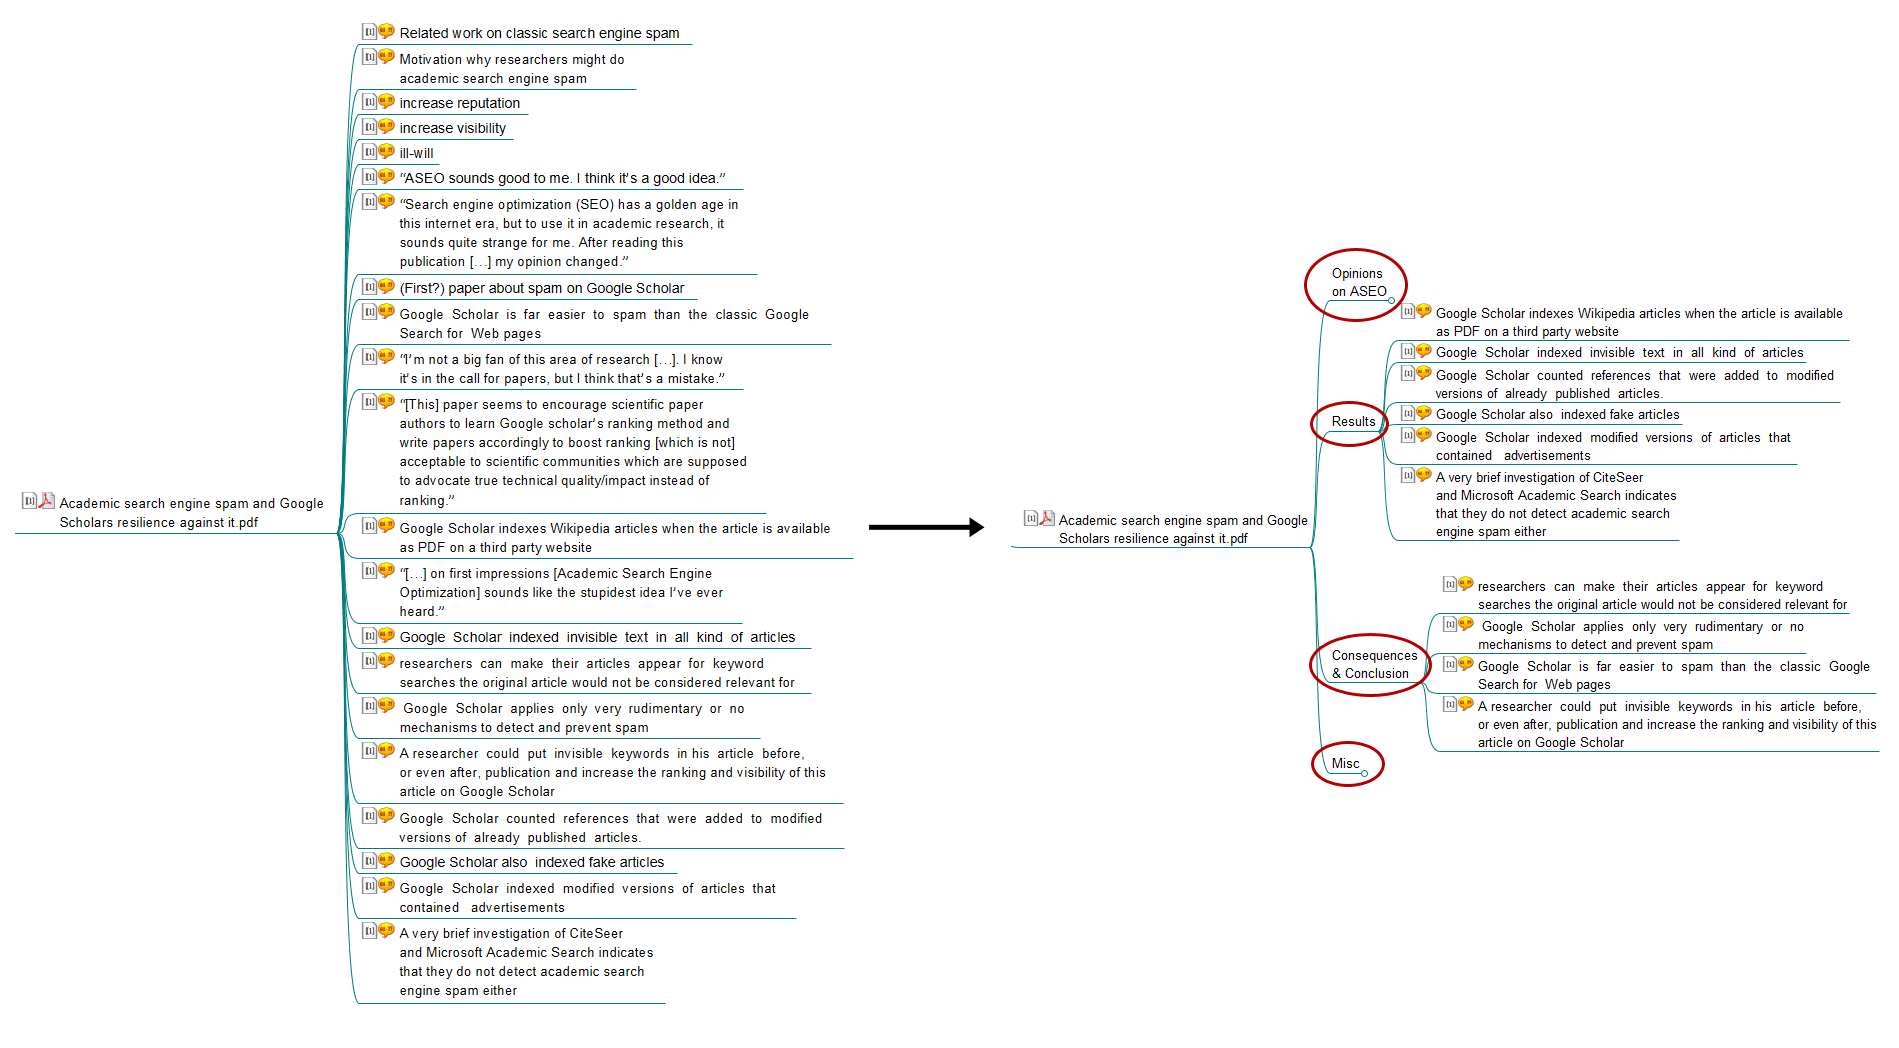
The left part shows a PDF with its original annotations. The right part shows additional categories I created to sort annotations within the PDF
Work with your PDFs and annotations
Open PDFs (Jump-to-page)
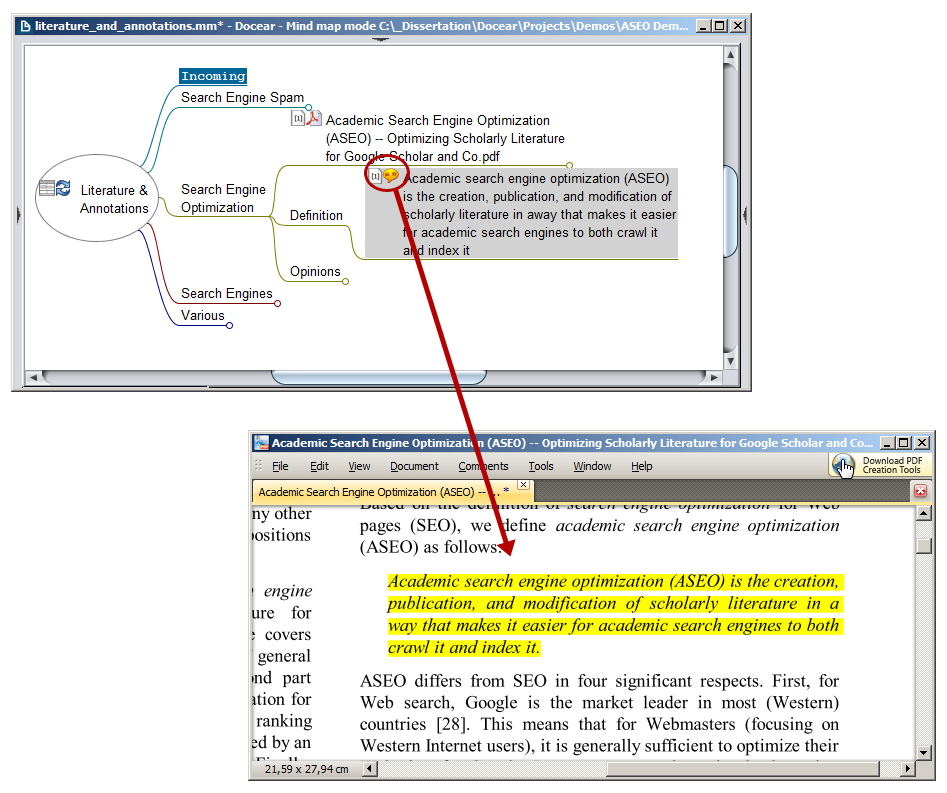
To look up information, click the PDF or annotation icon, and the PDF will open in your favorite PDF editor on exactly the page, you made the annotation. However, to enable Docear to open a PDF on the correct page, you need a compatible PDF viewer.
Edit annotations
Whenever you edit an annotation in Docear, it will be automatically changed in the PDF, and vice versa. If the annotation represents highlighted text, please note that Docear is not importing the text that is actually highlighted. PDF editors (should) copy the text you highlighted into an (invisible) popup note, and the text in this pop-up note is imported by Docear. Some PDF editors indicate such a pop-up note as a little icon (see screenshot below). If you move the mouse over the highlighted text, you will see the text that will be actually imported by Docear.
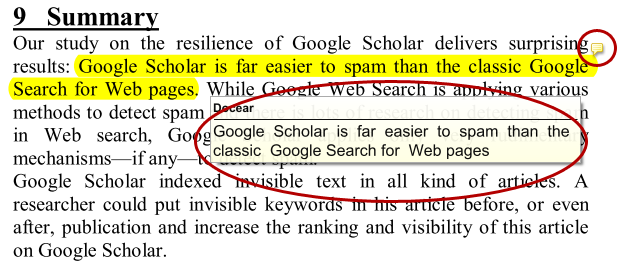
Most PDF editors allow to edit the highlighted text directly in the PDF: double click the highlighted text, and the pop-up note will open so you can edit its text. This is a great feature because if you highlighted a sentence like “It is far easier to spam than the classic Google Search for Web pages”, you might not remember later who or what “it” is when you see the annotation in your mind map. Hence, you change the text in the pop-up note to “Google Scholar is far easier to spam than the classic Google Search for Web pages”, and later you know exactly to which information the annotation refers.

Store new PDFs and create new annotations
When you store further PDFs in your literature repository, and want them to appear in Docear, you need to update the “Literature & Annotations” mind map. You do this the same way as you did the first time (e.g. click the refresh icon). However, be aware of the following.
- If you store a brand new PDF, this PDF will be added to your incoming node (1)
- If you create an annotation in a PDF that is already in your mind map, the annotation will be directly added to your PDF (3)
- If you create an annotation in a PDF, and your mind map contains other annotations of this PDF (2b) but not the PDF itself, the PDF and its new annotation (2a) will be added to your incoming node.
If you don’t like this behavior, look at the advanced monitoring options because there are many adjustments you can make.
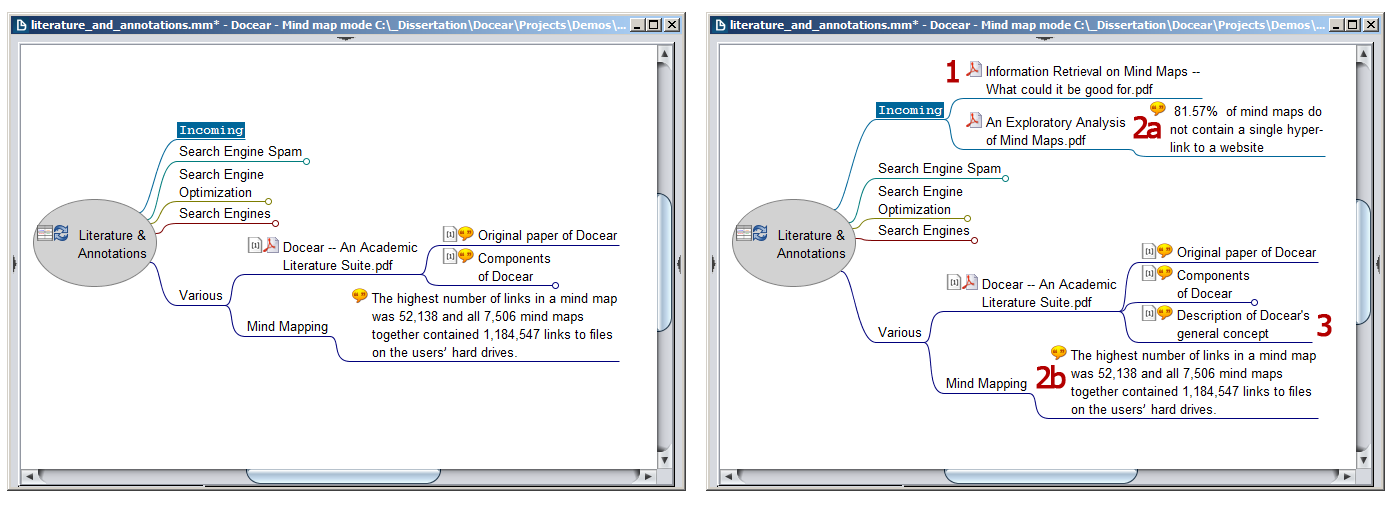
The left part shows the original mind map, the right part the mind map after new PDFs and annotations were imported. Added were (1) a brand new PDF not being in any mind maps before, (2a) an annotation and its parent PDF because although another annotation of that PDF is already in the mind map (2a), the PDF itself is not in any mind map, (3) a new annotation of a PDF that is already in the mind map.
Reference management
Create references automatically
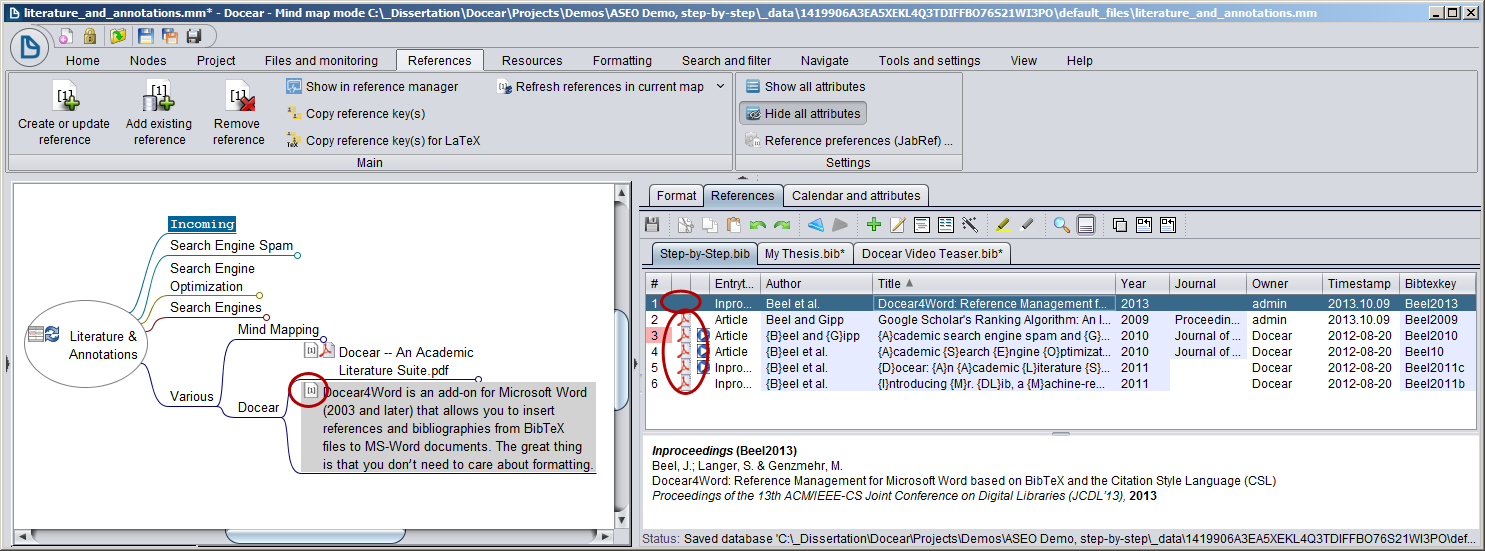
Docear extracts and retrieves bibliographic data for your PDFs (semi) automatically, and the data is shown when you move your mouse over a PDF. You can also permanently show bibliographic data by selecting “Show all attributes”.
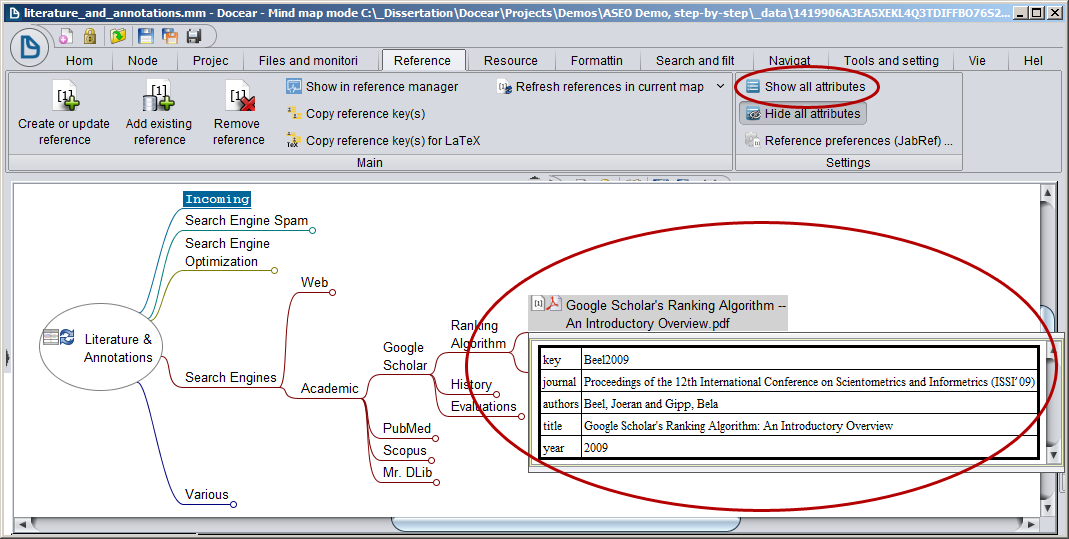
Currently, you need to tell Docear for which PDFs to retrieve metadata (in the future this might be fully automatic for all PDFs). To do so, select a PDF, and chose “Create or update reference” in the menu. You can either manually specify all the data (“Create blank entry linking the PDF”) or try to retrieve metadata from Docear’s Digital Library.

Metadata from Docear’s Digital Library is retrieved via a unique PDF hash that we create using the title. The title is extracted automatically from your PDFs. Before the title is send to Docear’s Digital Library, you can edit it. It’s important to submit the correct title, though it need not be complete. The most meaningful words are usually sufficient. However, one incorrect word can spoil the effectiveness significantly. Sometimes, also special characters like ‘ or ” or – may cause problems. If you don’t receive results, you could try again without these special characters and the corresponding words – in the example (see screenshot) this would be “Google Ranking Introductory Overview”.

Manage references manually
Docear integrates an entire reference manager, namely JabRef (a few functions were not integrated). In the reference panel you can create new references (1), have a list of all your references (2), and a section to edit the entries (3). Whenever you edit data in the reference panel, it should be automatically updated in the mind map. If it is not, select “Refresh references” in the menu (4). Btw. the editor section (3) opens after double clicking an entry in the list. If you close the editor section, the formatted bibliography will appear (see next screenshot)

The list of references may contain entries for which you have no PDFs, and you can also add references to nodes other than PDFs (or annotations). The following picture illustrates this. The reference list contains a reference for which no PDF is available (indicated by a missing PDF icon in the list for that entry). In the mind map there is a node about Docear4Word. The node is not linked with a PDF or annotation. Nevertheless, you can drag&drop a reference from the reference window to the node, and the bibliographic data will be added to that node (illustrated by the little white icon at the node). Alternatively, select a node and then select “Add existing reference” from the menu. This will also allow you to add an existing reference (from the reference list) to a node in your mind map. All data from that reference will be attached to the node. This means, if the reference in your reference list is linked with a PDF, the PDF link will also be added to the node you add the reference to. Last, but not least, if you have a PDF in your mind map with no reference, and a proper reference in your reference list without a link to the PDF, you can drag & drop the PDF from the mind map to the reference, and attach the PDF. Then, the reference data will be automatically assigned to the PDF in the mind map.
Matching of nodes and references
When an entry in the reference list is linked to the same file as a node in the mind map, then the bibliographic data is added to this node. This has the following consequences
- If you add a PDF link to an entry in the reference list that has no link to a PDF yet, the reference entry’s bibliographic data will be added to all nodes that link to the PDF.
- Since the matching is done only by the file name, but not the path, you should name all your PDFs differently. Otherwise, Docear might think that two entries in the reference list link to the same PDFs. This may cause problems.
That’s it, now you know how to organize your literature with Docear. We would like to emphasize that this concept is truly unique. Read on here if you want to know what exactly is so special about it. Otherwise, read on…
Draft your papers, assignments, books, theses, …
The basic process
When you have organized your literature with Docear, drafting your own papers etc. is easy. First, create a new mind map in which you draft your paper. Click with your right mouse button to the “My Drafts” folder, add a new mind map, and select an appropriate name for your mind map. You may also create sub-folders in “My Drafts” to organize your drafts.

In that mind map, you create new nodes for each chapter, paragraph and sentence. You are not restricted to only draft your paper in that mind map. Feel free to create additional nodes for to-do items, or to maintain a list of journals or conferences to publish the paper (see screenshot).

One great feature of Docear is that you can re-use your PDFs and annotations from your “Literature & Annotations” mind map. Just copy those PDFs and annotations that you want to reference to your new draft. Because switching between the two mind maps might be a little bit tiring, we would recommend to open another instance of Docear. This way, you have one instance with your draft, and one with your “Literature & Annotations” mind map. If you like, you can drag&drop nodes from one instance to another. However, you need a large monitor for this.

Mind mapping features
Docear offers full mind mapping functionality. In the following we will present you a list of the most useful features.
Links
There are four types of links. The first one is the one you already know, namely links to files (e.g. PDFs) on your hard drive. In addition, you can create
- Visual links: Hold the CTRL key on your keyboard pressed and select two nodes in your mind map. Select “Connect” in the menu.
- Hyperlinks: If you paste a URL (http://example.com) a new node is created that links this URL. Alternatively, select a node and chose “Add hyperlink” to add or edit a hyperlink manually.
- Internal links: Hold CTRL pressed, select two nodes, and select “Link node” in the menu. This creates an internal link (green arrow). When you click it, the mind map will automatically jump to the linked node.

You can even create labels for a “connection” that look like this:

To create such a label, do a right mouse click on the connection of two nodes. A new dialog will open, where you can enter a label. The dialog has no “OK” or “Close” button. You need to press ENTER to accept the label and close the dialog.
Cloud
Clouds help to visualize regions in your mind map that belong closely together. Select one or multiple nodes and select “Add / remove cloud”. You can also change shapes and colors of the clouds.

Formatting
The reference panel also the “Formatting” options to format nodes and edges (i.e. the line between nodes). In addition, you can select a node and choose “Edit (in dialog)” which will open the node’s text in a dialog with various formatting options.

Auto-Numbering
Auto-numbering is particularly useful for drafting papers because you can use it to automatically number your chapters. Select a number of nodes (hold the CTRL key pressed to select multiple nodes), open the format tab in the reference panel, and choose “Node numbering”.

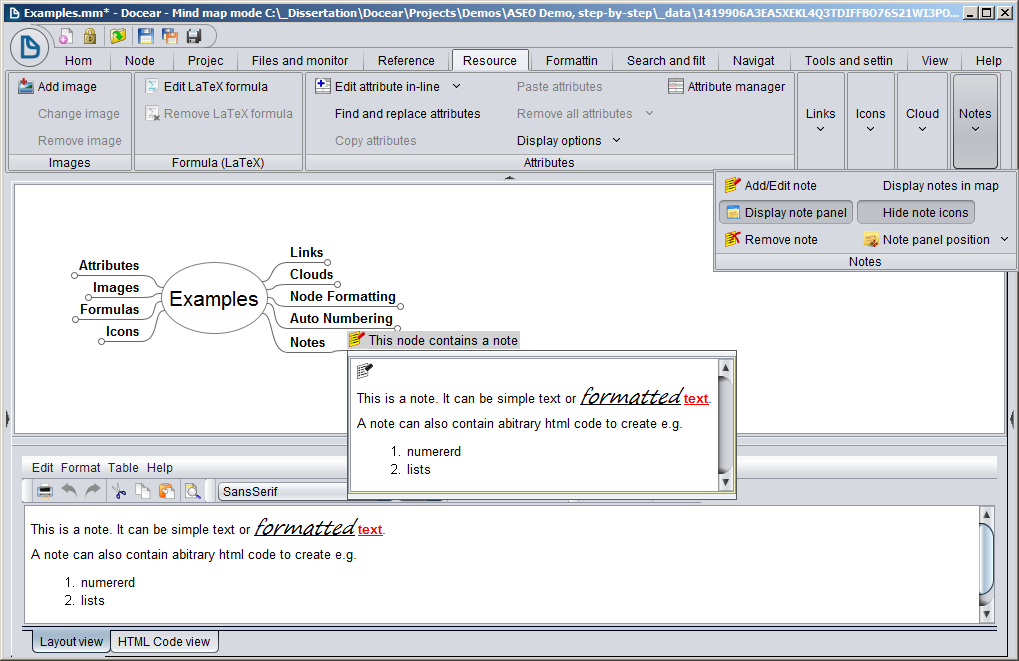
Notes
In Docear, you can create additional notes for each node. The note panel is shown via the “Resources” or “View” ribbon (“Display note panel”), or via pressing CTRL+> (this shortcut depends on your keyboard layout. With a German keyboard you need to press CTRL+SHIFT+<). When you create a note in the note panel, the corresponding node gets a note icon. When you move your mouse over the icon, the note is displayed directly in the mind map.
Attributes
Attributes are used for storing bibliographic data in the mind map but you can use attributes additionally to classify your papers. For instance, you could add the attributes “status” to your papers, and the values “to_read” or “top_read”, or “boring”, or whatsoever. You could also assign keywords to papers that you use for searching them later. More information on attributes will follow soon.

Images
You can add images to nodes. There are two options. Either you add an image as a normal link to a file. In this case, the image is not shown in the mind map but if you click on the node, the image will open in your external image editor. To do so, add a “normal” link to a local file to your node. Or copy and paste the image from your file browser.
Alternatively, images can directly be shown in mind maps. To do so, drag&drop an image from your file browser to a node.

Formulas
You can add LaTeX formulas to nodes which allows to insert mathematical symbols and formulas in your mind map. LaTeX requires some time to learn but it’s very useful especially if you are working in the field of mathematics, physics, chemistry, etc.

Icons
Icons help you to highlight certain nodes, or to do a simple way of project management. For instance, you can manage your to-do items in a mind map, and add progress icons to them. Adding icons is possible via the menu (1), or via the icon toolbar (3). To see the icon toolbar, do a right mouse click on an empty part of a mind map and activate “Icons toolbar”. Alternatively, activate the toolbar via the “View” ribbon.

Summary Nodes
Summary nodes help you to summarize the content of several other nodes. The below picture shows an example.

Free/Floating Nodes
Free nodes appear to be floating in the mind map. You can freely position them via drag&drop (move your mouse to the very left or right corner of the node, click, and move). However, sometimes free notes cause problems in the layout. We would suggest to not using them, except you really need them.

Write your papers, assignments, books, theses, …
Export mind maps
Docear offers a function to export your mind maps to Microsoft Word, OpenOffice, LaTeX, PDF, PNG, JPEG, SVG, and many formats more. You can use this function to export it to e.g. MS Word and then give your draft the final editing. However, we have to admit that the export function is not perfect. We suggest you try it to see if it fits your needs. Personally, we do not use the export function but draft our paper in Docear, and then write the entire paper/book/thesis/… in the text processing software. It’s a little bit more work but it has the advantage that you think about the text again very carefully. Typically, this results in a better paper than if you had just taken the text from the draft. However, be assured that we know that a good export function is important, and that it’s on our todo list.
If you are using the LaTeX, the export might be a little bit better because one of Docear’s users enhanced to export to include e.g. citations. Here is a brief explanation how to export a mind-map to LaTeX:
The export filter “latex input with cites and details” needs an input mind map that has a structure like a document. It will put out a complete latex document structure containing headings and content structured in headwords as well as text from the node’s details. That file(s) has to be included in your document template using \input{content}.
The mind map has to be hierarchical. All items which are numbered will become headings of the corresponding layer (e.g. direct sub nodes of the root node become chapters, their direct sub nodes will create sections, and so on). Sub nodes without numbering directly under a numbered one (no matter in which layer) become Paragraphs with a headline. All other structures are put in (nested) \description{} environments. Detail text of a node is put into the description items. Cites will result in a \cite{} at any place and thus put your notes from its sub nodes into a description environment. Notes will be a \todo{} annotation which requires the package todonotes.

With Microsoft Word
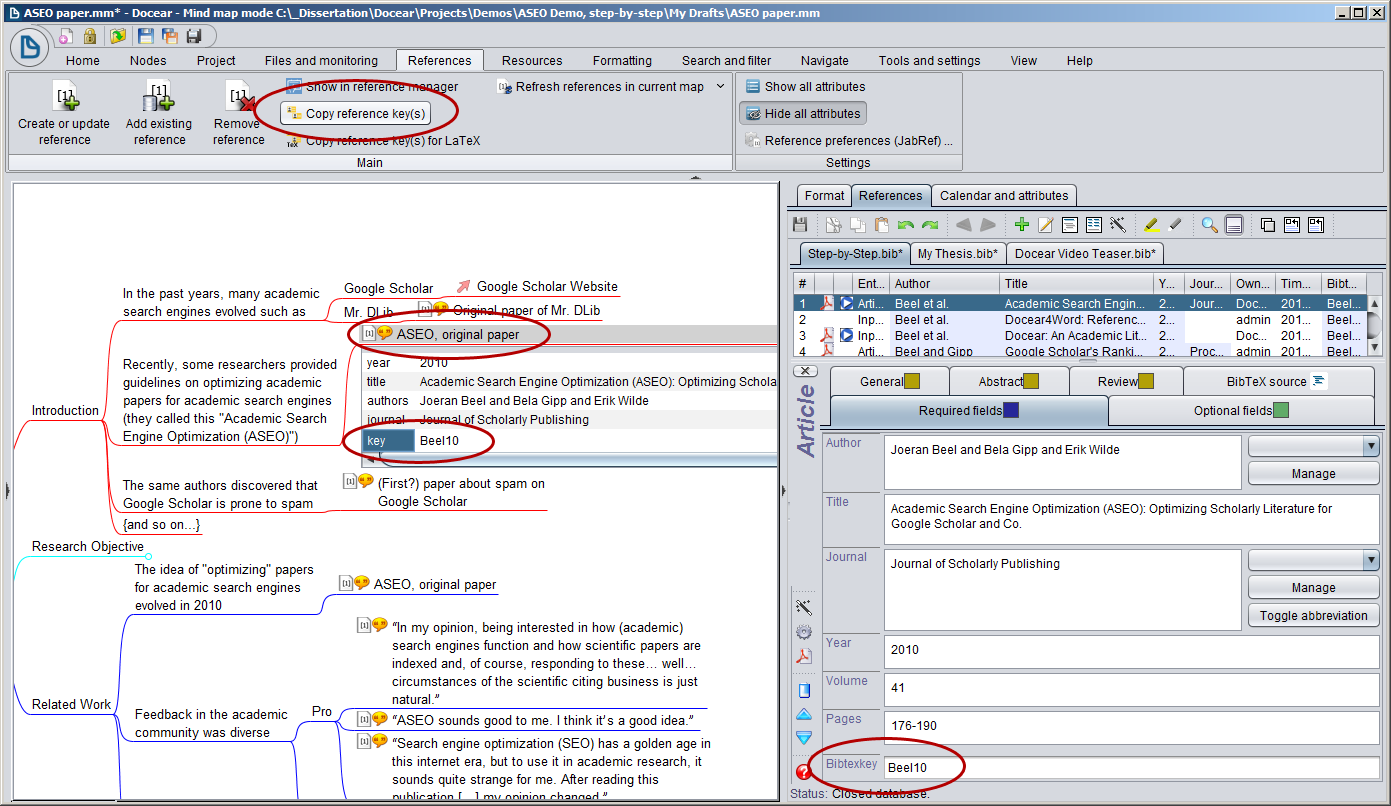
In Docear, each reference is identified through a unique ID, namely its BibTeX key (BibTeX is the data format the references are stored in). To copy references to MS Word, you first need to select the references you want to copy in your mind map or reference panel. You can select multiple references (i.e. the corresponding nodes) by holding the CTRL key pressed. Then, select “Copy reference key(s)” in the menu. This will copy the keys to your clipboard. If you have selected multiple references, all keys are copies to your clipboard, separated by commas (key1,key2,key3, …).
In Microsoft Word (after you installed Docear4Word), you write your paper, based on your draft, place your cursor where you want to insert a reference, and select “Add Reference” in the menu. A new dialog opens that shows you a list of all your references. If you have copied the references’ BibTeX key(s) to your clipboard in Docear, the “D->D4W” button will be active. You can press it, and all corresponding references will be selected automatically. Alternatively, select the references manually by clicking the check box. With the filter field, you can filter your list. You may also choose whether to insert the reference in a standard format, e.g. [1] or (Beel et al. 2010), the author only, the year only or author and year with only the year being in brackets.
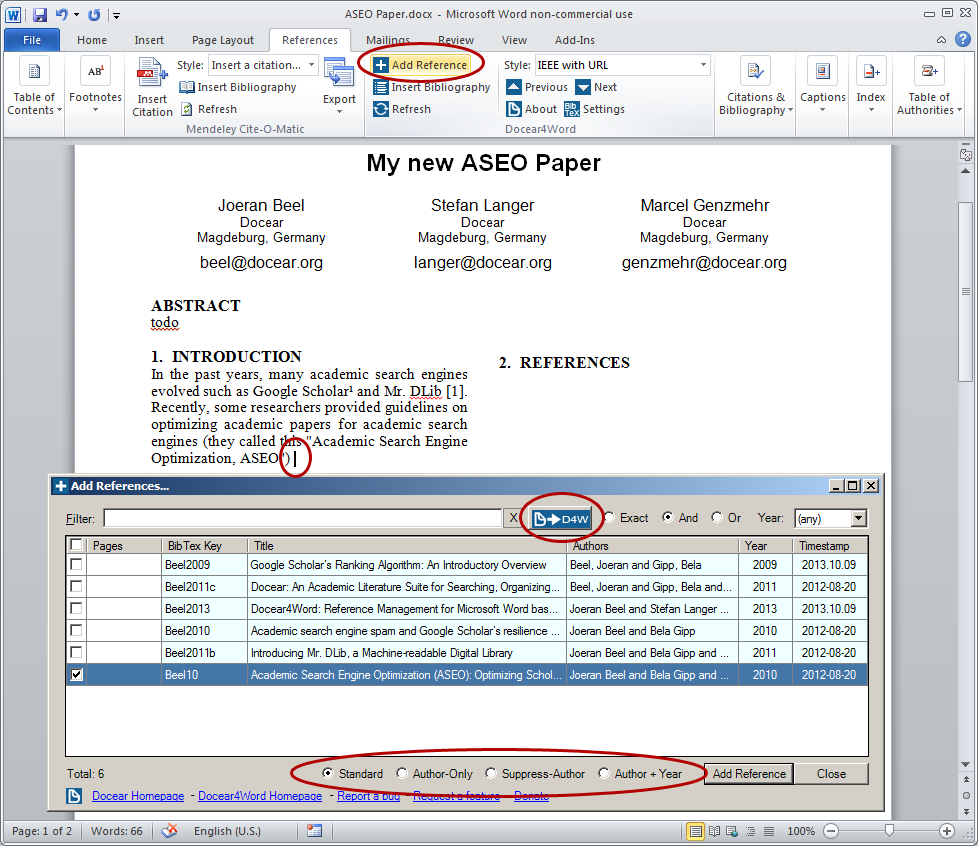
Next, you place your cursor where you want to insert your list of references, and chose “Insert Bibliography” in the menu.
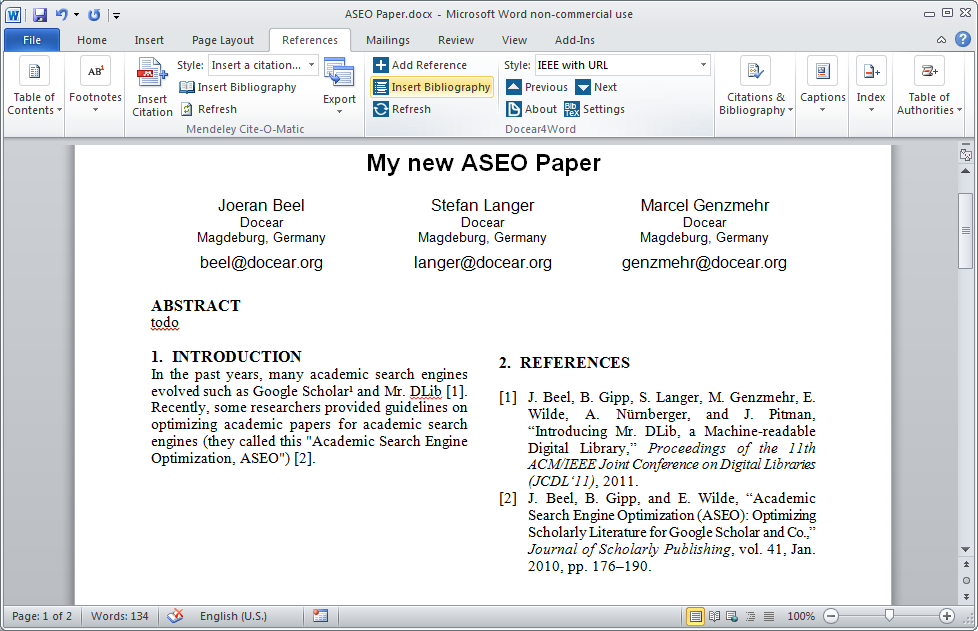
Finally, you can change the citation style by choosing it from the Style list. Docear4Word has only a few styles pre-installed. If the one you need is not in that list, choose here from more than 1700 citation styles.

With OpenOffice or LibreOffice
Currently, we have no add-on for LibreOffice or OpenOffice. If you know a developer who would be willing to develop such an add-on, please contact us. We also might be able to pay the developer.
With LaTeX
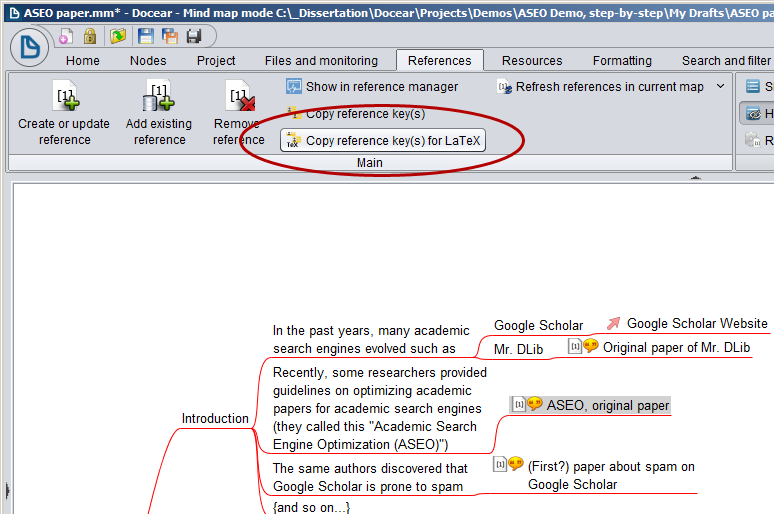
If you are using LaTeX, Docear allows you to copy the BibTeX key in the required format, i.e. \cite{key1,key2,key3,…}. Just select the reference you want to copy, and chose “Copy reference key(s) for LaTeX” in the menu.
Search and filter your references, PDFs, etc.
Docear offers different options to search and filter your literature, annotations, etc. Please read on to learn about the different options.
To search your currently opened mind-map, press CTRL+G or go to the “Search and Filter” ribbon and use the classic “Search” function.

To organize your literature with social tags (and attributes), please read here.
To search your references, open the reference panel and press CTRL+F or select the search button. Depending on your needs, select one of the search methods (filter, incremental, …)

To search your PDF’s full-text, Docear currently offers no build-in function, but we recommend to use e.g. the PDF search function from PDF-XChange Viewer, which is quite powerful. Most other PDF editors offer comparable functions.

To search for new literature in Docear’s digital library, with about 2 million publicly available PDFs, open the workspace panel and select “Online search”.

Discover new literature
Docear has a recommender system for academic literature. If you activate the recommender system, Docear will analyze your PDFs and mind maps to identify your research interest (of course, we respect your privacy). Once a week, or when you click the recommendation icon (1), you receive a list of up to ten recommendations. All recommended papers are free and instantly downloadable, in full-text, as PDF. You can either open the PDFs in your browser, by clicking the title (2), or you can download the PDF directly to your literature repository (3a+3b).

Enhance your productivity
Keyboard Shortcuts
Customize Shortcuts
Setting your own keyboard shortcuts is a piece of cake. Hold the CTRL key pressed, and click the entry in the menu you want to set the shortcut for. A dialog will pop-up in which you press your desired keyboard shortcut. Done!

Learn existing shortcuts (on hover)
When you move your mouse over an entry in the menu, a layer will show after a few seconds showing the associated shortcut (if there is one). This means, if you press this shortcut (e.g. CTRL+W) the corresponding function will be executed immediately (e.g. closing the current mind map).
List of most important keyboard shortcuts
| ENTER | Add sibling above current node |
| SHIFT+ENTER | Add sibling below current node |
| INS | Add child node |
| F2 (or double click it) | Edit node in-line |
| ALT+ENTER | Edit node in dialog |
| SPACE | (Un)fold node |
| Page UP/DOWN | Go to highest/lowest node in that level |
| ESC | Go to root node |
| CTRL+SPACE | (Un)fold children |
| ALT+PAGE UP/DOWN | (Un)fold next level |
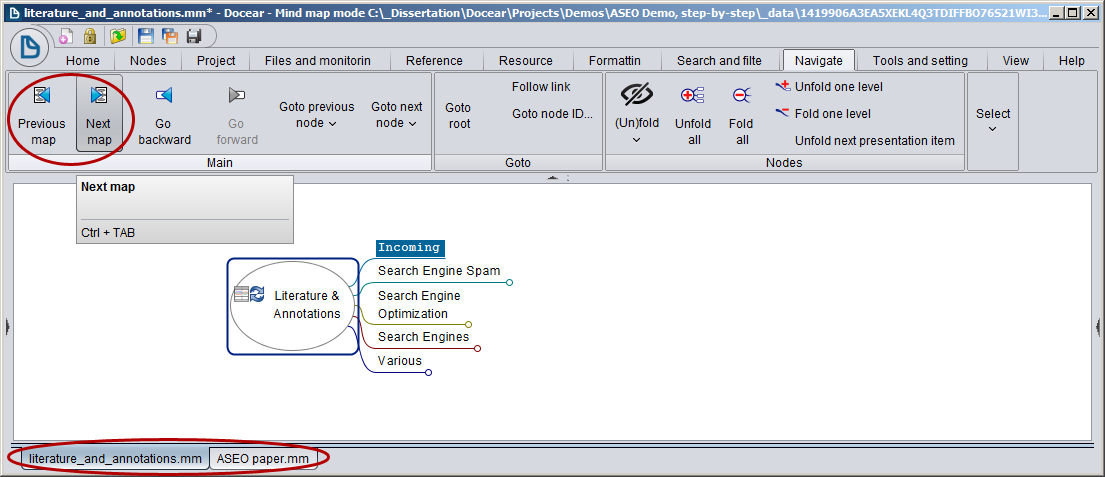
| CTRL+TAB | Switch to next map |
| CTRL+SHIFT+TAB | Switch to previous map |
| WIN+LEFT | Move application to left part of the screen |
| WIN+RIGHT | Move application to right part of the screen |
| WIN+UP | Maximize application window |
| ALT+F9 | Edit attributes inline |
| CTRL+MOUSE WHEEL | Zoom in/out |
| MOUSE WHEEL | Scroll up/down |
| TAB | Hide/Show menu elements |
| CTRL+S | Save mind map |
| CTRL+G | Open search dialog |
| ALT+UP | Move selected node up |
| ALT+DOWN | Move selected node down |
| ALT+RIGHT | Move selected node to the right |
| ALT+DOWN | Move selected node to the left |
Windows specific
Did you know that if you press the Windows key on your keyboard and the left (or right) arrow key, your currently active window will be moved to the left (or right) half of your screen? This function comes in handy when you want to work with two windows at the same time. You don’t need to place the windows manually, but just press Win+Left for the one application (e.g. Docear), and Win+Right for the other application (e.g. your PDF reader). If you want one application to run in full-screen you press Win+Up.
Navigate in you mind maps
Moving the map
To move your mind map, click to an empty part of the map, hold the left mouse button pressed, and move the mouse to move the map. Alternatively, use the mouse wheel to scroll up and down.
Zooming
Use to zoom buttons in the menu or “CTRL+Mouse Wheel” to zoom in and out of your mind map.

Browse through nodes
With the arrow keys, you browse through your nodes. Press Right to move the selection to the right, press Down to move the selection down, etc.

Fold and unfold nodes
Press the (Un)fold entry, the little “bubble” at the end of a node, or press SPACE to hide or show child nodes of the currently selected node.

Select “(Un)Fold children” or press CTRL+SPACE to show/hide the grand-children of the currently selected node.

To (un)fold the next level of the currently selected node, choose “Unfold one level” (or “Fold one level”), or press ALT+Page_Down (or ALT+Page_Up)

Jump to first/last sibling
With PAGE UP and PAGE DOWN on your keyboard you can jump to the first/last sibling of the currently selected node

Edit nodes
Press F2, double click a node, or select the corresponding entry in the menu to edit a node in-line

Press ALT+ENTER to edit a node in a dialog, which gives you more editing options

Move nodes
With CTRL+UP/DOWN/LEFT/RIGHT, or the corresponding menu entries, you can move nodes. Alternatively, use the mouse to drag&drop a node, and to add it as sibling or child to another node.

Selecting multiple nodes at once
Sometimes, it might be handy to select multiple nodes at once. To do so, hold the CTRL key pressed, and select multiple nodes with your mouse. Alternatively, press SHIFT and use the arrow keys to select multiple nodes.
Maximize your working area
to hide all components, except the mind map panel, chose “Maximize map view”, or press TAB

Using a large monitor
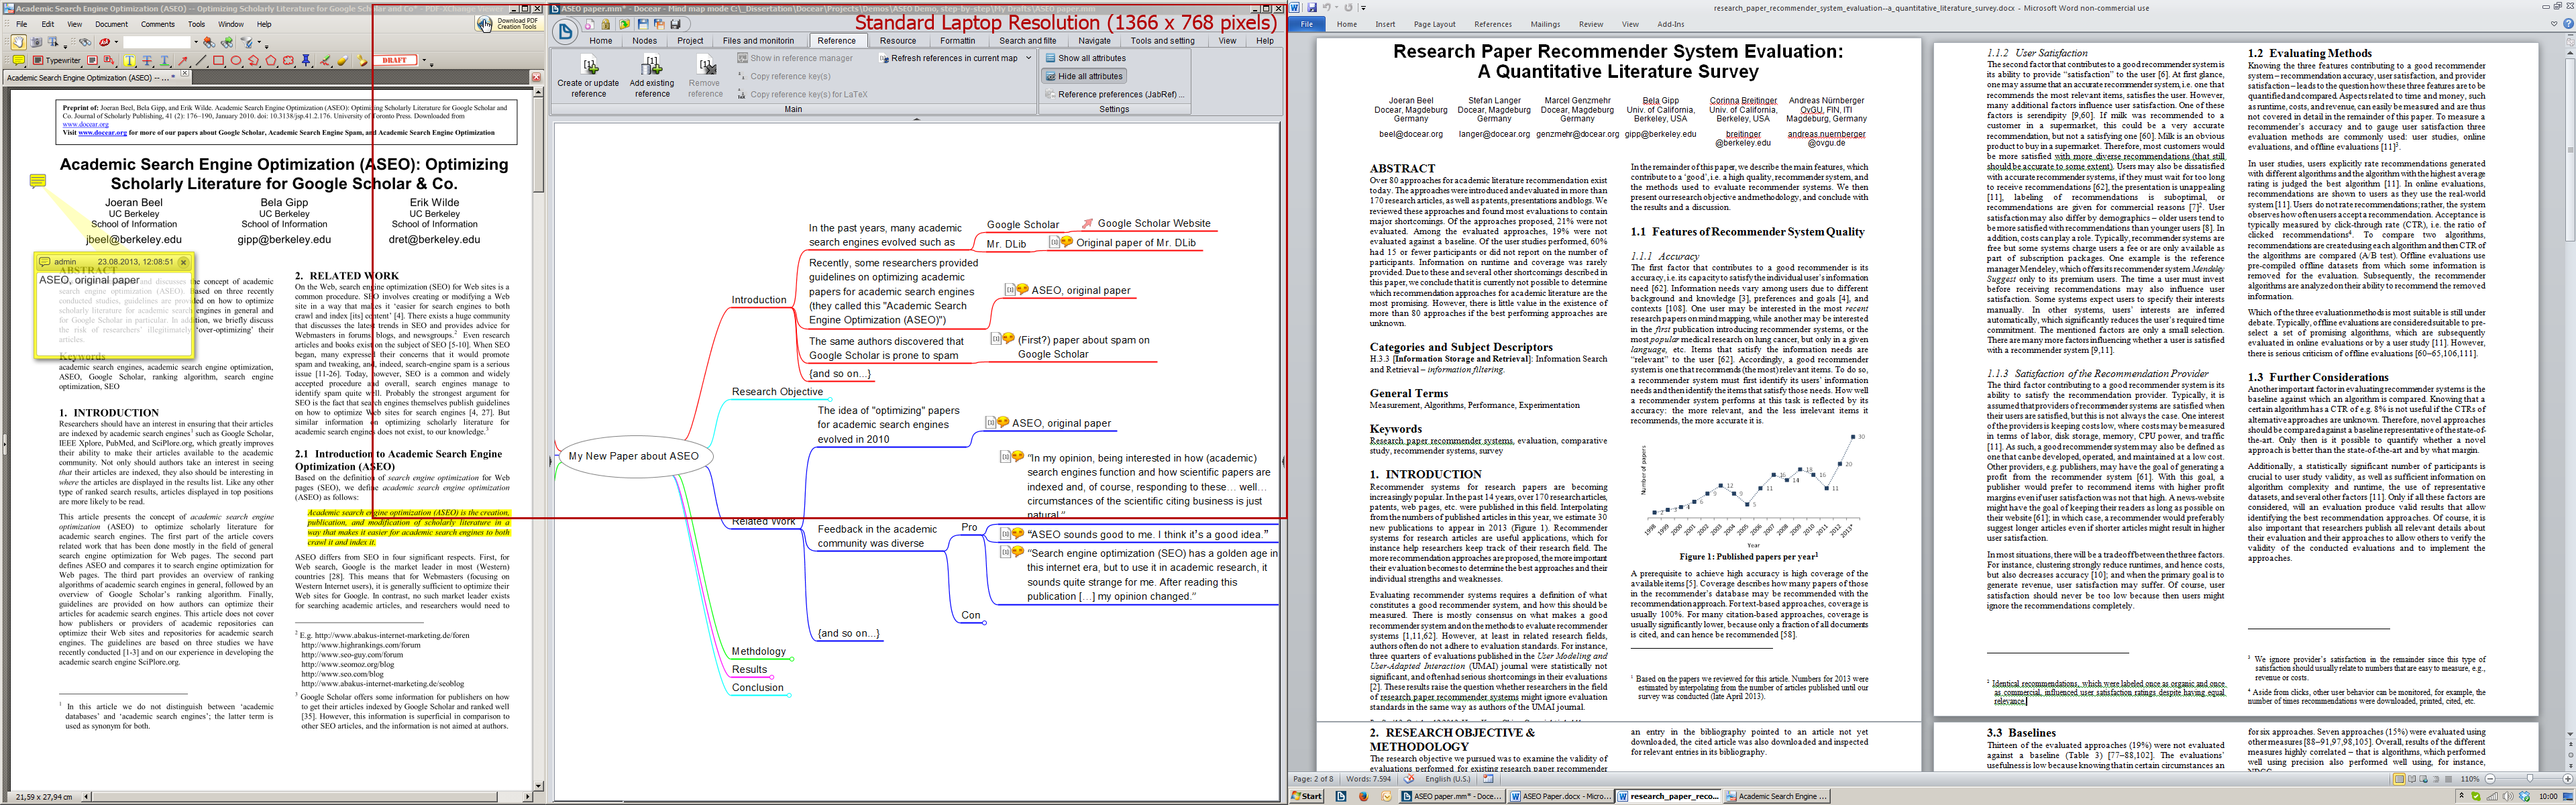
If you really want to work productively with Docear, the best you can do is using a large monitor, or even better: two large monitors. Even if you are using a laptop, it’s easy to connect an additional monitor to it (while using your laptop as second screen). We would recommend at least a 27″ monitor with 1920 x 1080 pixels, though a 27″ monitor with 1920 x 1200 pixel is significantly better, and a 30″ monitor with 2560 x 1600 is just superb. Two large screens allow to …
… work in Docear and read a PDF at the same time…

… have two instances of Docear, one with your “Literature & Annotations” mind map, and one with your current draft for a paper.

… write your paper while having your draft and a PDF visible at the same time…
… work with Docear and watch your favorite movie in HD :-).

Working with multiple mind maps
You can open multiple mind maps at once, each in a separate tab. First you need to open several maps via double clicking them in the workspace panel. To switch between mind maps, use the menu, click on the tabs, or press CTRL+TAB (switch to next map) or CTRL+SHIFT+TAB (switch to previous)
Working with multiple instances of Docear
Switching between different maps becomes tiring. Therefore, it might be handy to open Docear twice, e.g. once for your “Literature & Annotations” mind map, and once for your current draft. We would not recommend, opening the same mind map twice because Docear does not (yet) synchronize between the two instances.
You can also move PDFs from the incoming node to your temporary mind map. Actually, if you have many new PDFs, it’s sometimes tiring to sort your PDFs from your incoming node to the categories in your mind map because you would have to permanently switch between incoming node and categories.
Watch multiple folders for new files
You might want to store your PDFs in different folders, for instance c:\university\my pdfs\ and c:\university\pdfs from colleagues\. To let Docear watch several folders, add these folders to your literature repository via the menu or doing a right mouse click on your literature repository. However, the easiest solution would be to store your PDFs in c:\university\pdfs\mine\ and c:\university\pdfs\colleagues\, and then just watch c:\university\pdfs\.

Create your own monitoring nodes and mind maps
As mentioned, it might be tiring, to sort PDFs from the incoming node to your categories because you always would have to switch between Incoming node and categories. One solution could be to manually move your PDFs from your incoming node to your Temp map and open this map in a new instance. However, if that is the way you want to manage your literature, there is a better solution, namely a completely new map with a monitoring function.
Create a new mind map (right mouse click on “Library”), and name it e.g. “Incoming”

You open the new Incoming mind map, select the root node, and chose “Add monitoring folder” in the menu. You follow the instructions on the screen and select the folder that contains your PDFs (if you want several folders to watch, just pick one of them). Now, you have the same functionality as in your “Literature and Annotations” mind map. When you click the refresh icon on the root node, all PDFs and annotations that not in any of your other Library mind maps yet, will be added to the incoming node. However, there are many settings you may change (read on in the next section). Btw. you don’t have to place a monitoring node on the root node in a new mind map. You can add this functionality to any node, in any mind map, you want.

Having a separate incoming mind map, will change one thing more. With the “default” concept, annotations that are created in a PDF which is already linked in e.g. the “Literature & Annotations” mind map, will be directly added at the PDF in that mind map. If you have a separate Incoming mind map, new annotations will be added in that Incoming mind map.
Btw. you can also have an Incoming mind map and use the monitoring function in the “Literature & Annotations” mind map, too. Of course, once a new PDF is added, for instance in your Incoming map, it won’t show up in the incoming node in your “Literature & Annotations” mind map.
Configuring your incoming nodes
There are many options to adjust the monitoring function to you needs. Most of them are available via the menu (1), but not all. To get access to really all options, you need to change the attributes of the monitoring node (2). To make them visible, select “View -> Attribute Options – > Show all attributes” in the menu (and the same way you hide them, if you don’t want to see them).

Folders to watch for new files
mon_incoming_folder specifies which folder you want to watch for new PDFs. You can enter a path, relative to your project root, e.g. project://1419906A3EA5XEKL4Q3TDIFFBO76S21WI3PO/my pdfs/ whereas the long number is your project ID. If you want to watch your entire litrature repository for new files (remember, the literature repository may consist of multiple folders), enter a @@literature_repository@@ as value.
Mind maps to consider
mon_mindmap_folder specifies in wich mind maps Docear is looking for already imported PDFs. This means only PDFs and annotations that are not already linked in a mind map in mon_mindmap_folder will be imported. By now, the only valid value is @@library_mindmaps@@ which means, PDFs and annotations not being in a mind map in your library will be imported.
Monitor automatically
mon_auto specifies whether the update process should start automatically when you open the mind map, or only after clicking the refresh icon.
Exclude sub-folders from monitoring
mon_subdirs specifies whether sub folders of the folder containing PDFs are watched, too.
List new files in “incoming node”
mon_add_extra_incoming_node specifies whether an extra “incoming” node is created in which new PDFs and annotations are added. The incoming node is always created as a child of that node that has the monitoring function.

Flatten monitoring folders
mon_flatten_dirs specifies whether Docear keeps the original file structure on your hard drive or ignores it, when importing PDFs and annotations

Valid values for the settings
For the latter four settings, values can be 0, 1, or 2. ‘0’ means ‘off’, ‘1’ means ‘on’, and ‘2’ means ‘default’. The default values may be changed in your Docear preferences.

Changing the type of files to watch for
Docear watches your literature repository not only for new PDFs but also for many other file types, e.g. Word documents, Excel sheets, images, etc. The file types Docear is monitoring may be specified in the preferences (see screenshot above).
Remove line breaks and spaces from imported annotations
Sometimes, when you highlight text in a PDF, the PDF editor adds line breaks and additional spaces between words. Docear offers a function to remove these line breaks and spaces.

Use attributes to classify and group your literature
Please read in our Blog.
Import References from the Web (e.g. PubMed, ACM, Elsevier, …)
Please read in our Blog.
Extending the Workspace (Importing files and folders)
You can extend the workspace and (1) import folders from your hard drive. This allows you quick access to files that might be stored outside your project home. Of course, you can also import folders that are already inside your project home. Additionally, you can create Virtual Folders (2) and link arbitrary files in these folders. This is comparable to shortcuts under Windows. The virtual folder does not really exist (except in Docear) and the files in it only point to the real files, while the imported folders (2) are 1:1 representations of a real folder on your hard drive.
To create such folders, or link files, right click on the project name in your workspace, select “Add – New folder…” or “Add – New link to file” and follow the instructions.

Importing only certain kinds of annotations
In the preferences you can select which type of annotations you want Docear to import.

Deleting annotations from mind maps without having them re-imported
Sometimes, PDFs contain annotations which you want to have in the PDF (e.g. the table of contents, stored as bookmarks), but which you don’t need in your mind maps. To deal with this problem, you should move these annotations to your Trash mind map. If e.g. the bookmarks for a PDF’s table of content are in the Trash map, you still have them in your PDF but they won’t appear in your “Literature & Annotations” when you refresh it.
Docear’s Online Services
Backup & Versioning
If you activate this function, all your mind maps are stored on our server each time you save a mind map in Docear (of course, the original file remains on your computer). If you are not online at the time of saving, a copy is created and uploaded to our server the next time you are online. Your backups can be accessed through our web interface and you can not only access the latest version of your mind map but also all other revisions. That means, if you realize you made a mistake or you deleted a mind map by mistake, you can restore your mind map easily. In the future we plan to backup your reference data and PDFs as well, but for now only mind maps are stored on our server. If you use our backup feature, we will do some basic statistical analysis on your data. That means we will analyse how many users have how many mind maps (min, max, avg), how large mind maps are (file size), how often they are edited, etc. But we will not look into you mind maps.
If you are interested in a excellent backup solution, not only for your Docear data, you might also want to have a look at Backblaze. Blackblaze permanently creates continuous online-backups of all your files on your computer for 3.96$/month. Some members of Docear are using Backblaze and are absolutely happy with it. Alternatively, you could have a look at Mozy who is offering a similar service but up to 2 GB storage are completely free. Our experience with Mozy is not as positive as with Backblaze but the free version is certainly worth a try if you cannot spare 3.96$ a month.
Synchronizing between computers
We are planning on offering a tool for synchronizing your data between different computers but this will take at least a few more months of work. Meanwhile, we recommend using Dropbox for synchronising files. Dropbox gives you 2GB free space for synchronizing any files you want and is really easy to use. And if 2GB are not enough you can get more if you pay for it. If you need a more advanced solution and want to work with different people on the same data, we recommend SVN respectively TortoiseSVN (however, this is not easy to setup).
To sync files among different computers, you need to store your project folder in e.g. Dropbox (or Google Drive, Microsoft Onedrive, or however you sync your files). On the second (and third, …) computer, you need to install Docear and import your project(s) from your Dropbox folder. Importing a project is easy. In Docear, just select Project -> Import Project, select your project home folder (e.g. ./dropbox/my_university_work/), and follow the instructions.
If you are using different operating systems, or if you are storing projects in different paths you might experience some minor problems: probably the links in the reference panel will not work. This means, if you click e.g. a PDF icon in the reference panel, the PDF will not open. However, links in the mind-map and workspace should be working.
For advanced computer users, there is a workaround to make links work in the reference panel. A standard BibTeX entry in your reference database looks like this
@ARTICLE{Beel10,
author = {{B}eel, {J}oeran and {G}ipp, {B}ela and {W}ilde, {E}rik},
title = {{A}cademic {S}earch {E}ngine {O}ptimization ({ASEO}): {O}ptimizing {S}cholarly {L}iterature for {G}oogle {S}cholar and {C}o.},
journal = {Journal of Scholarly Publishing},
year = {2010},
volume = {41},
pages = {176–190},
file = {:C\:\\Users\\admin\\Docear\\projects\\your_project_name\\literature_repository\\Academic Search Engine Optimization (ASEO).pdf:PDF},
}
The problem when it comes to synchronization is that on your second computer the path C\:\\Users\\admin\\Docear\\… probably does not exist because you stored the project somewhere else. Hence, the linked PDF cannot be opened. However, there is a workaround because Docear (more precisely JabRef, on which Docear is based on), can also handle relative links. To get relative links, you need to do the following (if you want us to do the job, please read here):
1. Close Docear
2. Open your BibTeX file with a text editor
3. Add the line
@comment{jabref-meta: fileDirectory:<path>;}
to your BibTeX file and replace <path> with the path of your PDFs relative to the location of the BibTeX file.
If your PDFs are in the same location as your BibTeX file, just replace <path> with a dot (‘.’). However, usually, your BibTeX file is stored in a place like
C:\Users\admin\Docear\projects\your_project_name\_data\148D09F686A3RMGAYIYW0UMMW8XDN012ON8I\default_files\
while your PDFs are stored in
C:\Users\admin\Docear\projects\your_project_name\literature_repository
In this case, you would have to replace <path> with ‘./../../../literature_repository/’ (without the ‘).
4. Next, remove all paths in your BibTeX file, i.e. your BibTeX entries should change from e.g.
…
file = {:C\:\\Users\\admin\\Docear\\projects\your_project_name\\literature_repository\\Academic Search Engine Optimization (ASEO).pdf:PDF},
…
to
…
file = {:Academic Search Engine Optimization (ASEO).pdf:PDF},
…
5. Close and save your BibTeX file
6. Start Docear and check out if the links are working
Please note, you need to perform step 5 each time, a new entry is created in your BibTeX file. Ideally, you write yourself a little script that does this every time you synchronize your files. We know, this solution is not ideal and an improvement is on our to do list.
Data privacy
If you don’t want, we do not collect any data. You can just download Docear, install it, use it without any registration and we will not collect any data about or from you*. However, we would be very happy if you share some of your data with us and allow us to analyse it. One reason why we originally developed Docear was because we wanted to research how researchers work, how mind maps look like and how to provide literature recommendations to researchers (see also our publications and fields of research). Therefore, in Docear’s preferences you can enable the option to share your data with us and allow us to analyse it. “Your data” includes your mind maps, PDF files, BibTeX file and usage data of Docear. We assure you that we will not give your personal information (such as name, email. etc.) or entire mind maps to third parties. For details please have a look at our TOS or contact us.
* When you visit our website, your IP might be stored temporarily by us and by Google Analytics which we use to analyse the usage of our website.
Docear Web
Someday there will be a web version of Docear but it certainly will take a while. Meanwhile, be aware that Docear is using a compatible file format with Freeplane and FreeMind. That means all web based mind mapping applications that can read FreeMind and Freeplane mind maps, should also be able to read Docear mind maps. Let us know which online mind mapping tools work best with Docear.
Docear Mobile
Someday, there will be a mobile version for Android and iOS but this will take a while. Meanwhile, be aware that Docear is using a compatible file format with Freeplane and FreeMind. That means all mobile mind mapping applications that can read FreeMind and Freeplane mind maps, should also be able to read Docear mind maps. Some potential candidates include iThoughts (iPhone) and iBlueSky (iPhone). Let us know which mobile mind mapping tools work best with Docear.
PDF Editors
Overview
Here is a list of PDF editors and their compatibility with Docear. Please let us know if something is not correct or you tried a PDF editor that is not on the list.

Update: The developers of Xodo PDF Viewer wrote us: We had a number of Docear users request that we change Xodo’s behavior so that it includes the content of annotated text in its note property so that docear is able process the PDF. We’ve now added this feature to the Android version of Xodo. It can be turned on in Settings, under “Annotating, Copy Annotated Text to Note”. (We’re planning on adding it to our Windows version soon too, and I’ll get in touch again when it’s available.)
There are many PDF viewers, but truly perfect for Docear are only a few. The following criteria are important
- Annotations must be stored in the PDF standard format. Most PDF viewers do this, except Skim and Mendeley.
- The PDF editor should be able to highlight text. Highlighted text is the most comfortable option to annotate your PDF, though there is one problem. Docear does not import the text that was actually highlighted. Instead, some PDF editors copy the highlighted text into an invisible comment field, and this is the text that Docear imports. This means, it’s not sufficient that your PDF editor can highlight text. It must also copy the highlighted text into the comment field. To check if your PDF editor does this, move your mouse over some highlighted text. If the text shows in a pop-up window, everything is great.
Some PDF editors allow to edit highlighted text directly in the PDF. Double click the highlighted text, and the pop-up note will open so you can edit its text. This is a great feature because if you highlighted a sentence like “It is far easier to spam than the classic Google Search for Web pages”, you might not remember later what “it” refers to, when you see the annotation in your mind map. Hence, you change the text in the pop-up note to “Google Scholar is far easier to spam than the classic Google Search for Web pages”.
- The PDF editor should be able to create comments in a PDF. “Comments” are sometimes called “(sticky) notes” and look like this:

- The PDF editor should also be able to create bookmarks in the PDF
- When you click an annotation in your mind map, Docear needs to tell your PDF editor on which page to open it. Most PDF editors can do this. However, once a PDF is opened, it is usually not possible to tell the PDF editor to jump to another page. This means, you may click annotation A in your mind map, and the PDF opens on the correct page. But when you click annotation B in your mind map (and B is in the same PDF as A), your PDF editor will remain on the page of annotation A. One of the few PDF readers that can change a page for an already opened PDF is PDF-XChange Viewer. In addition, as far as we know, all PDF readers for MacOS support this feature.
- Some PDF editors require that you manually change some settings. Sometimes Docear automatically changes the settings, and some run instantly “out-of-the-box” without any modifications. And sometimes, you need to modify the settings manually.
PDF-XChange Viewer
PDF-XChange Viewer is the only PDF viewer that we can truly recommend, since it supports all the features that Docear requires. Please note, there is the free PDF-XChange Viewer, and the non-free PDF-XChange Editor – do not download the Editor but the free Viewer. It needs two settings to be changed to enable Docear to import highlighted text. Usually Docear automatically changes this setting. However, if Docear does not import highlighted text you created with PDF-XChange Viewer, enable these settings in the preferences of PDF-XChange Viewer.

If you are using PDF-XChange Viewer on Linux (e.g. Debian or Ubuntu) you can do that using WINE. Please find more information here.
Adobe Reader (Windows and MacOS)
Adobe Reader X does not create bookmarks but comments and highlighted text. However, the jump-to-page feature is limited and creating highlighted text requires some additional labor. First, you need to change the preferences of Adobe Reader. Usually Docear is making these changes automatically but if there should be problems, open the preferences of Adobe Reader and tick the box “Automatically open comment pop-ups for comments other than notes”.

The problem is, Adobe Reader does not copy highlighted text into the comment fields. Therefore, whenever you highlight text, you mark the text, copy it to the clip board (right mouse click or CTRL+C)…

… and then do again a right mouse click on the selected text, chose “Highlight Text” and paste (CTRL+V) the text from the clipboard. This way, Docear can import the highlighted text.

In addition, you should change the following setting in the preferences. Otherwise, there will be some PDFs in which you cannot create annotations (those created as PDF/A).

Adobe Reader (Linux)
In theory, Adobe Reader for Linux should work the same way as Adobe Reader for Windows. However, on our Linux systems, it doesn’t! We cannot create any kind of annotation, because the corresponding toolbar is always inactive. If it works for you, please let us know.
Adobe Acrobat
If Docear should have problems to import highlighted text created with Adobe Acrobat, check Adobe’s preferences. The highlighted setting should be ticked. You may also want to activate the setting “Automatically open comment pop-ups for comments other than notes”. This will open a pop-up window each time you highlight text and you can edit the text that is imported by Docear.

In addition, you should change the following setting in the preferences. Otherwise, there will be some PDFs (those created as PDF/A) in which you cannot create annotations.
Mendeley
Mendeley has an integrated PDF viewer that allows you to highlight text and create comments. However, Mendeley is storing comments and highlighted text in a proprietary format that cannot be exported to the PDF standard format. This means, all comments you create with Mendeley’s PDF editor, can never be read by any other PDF viewer. You can ask the Mendeley team to implement a decent PDF export, but chances for an implementation seem rather low. Therefore, if you want to use Docear (or any other PDF viewer other than Mendeley), you must not use Mendeley’s PDF Viewer. You may also read in our Blog about this issue (in particular the comments).
Foxit PDF Viewer
Foxit Reader generally is a fine PDF viewer (it creates comments and bookmarks) but Docear cannot import highlighted text that was created with it. Feel free to ask the Foxit Reader developers to enhance their reader, so it copies the highlighted text in the invisible pop-up notes.
Okular
We do not know for sure whether Okular works. With our own GNOME Linux it does not. However, many users report that Okular works fine with KDE. You might need to use the “PDF Export” method and overwrite your existing PDF to store annotations in the PDF properly. For more information, read also in our forum and on superuser.com.
Preview (Mac OS)
We strongly recommend to not use Preview since Preview often corrupts PDFs. For instance, when you create new annotations in a PDF, chances are that Preview changes annotations IDs or just deletes them. Preview also deletes XMP metadata. And there are some other shortcomings that may lead to corrupt PDF files. Please note that these problems have been reported by several users in the Adobe Forums and we could also reproduce them. So, if you insist on using Preview, be aware that Preview might delete some of your data (annotation IDs, XMP meta data, …) which, in turn, means that Docear cannot import the annotations or imports them multiple times.
Skim
Skim is not compatible with Docear, because it does not store annotations in the PDF standard format but in an external database. You can test this by mailing or copying your PDF file to another computer. You won’t see any annotations you have created using Skim on your original machine.
One user reported the following workaround:
1. Create annotations/notes/highlights with skim in a pdf file.
2. Export the file and choose “PDF, with embedded notes”.
3. Docear can import the annotations/notes/highlights. And they are also editable and show up in Skim.
4. However, the annotations are not editable anymore via Skim. To overcome this, every time you open the PDF with Skim you need to choose File>Convert Notes to convert PDF-notes to Skim notes.The “Jump-to-page support” does not work, but this is not crucial for me.
Please note that we have not yet tested this. If you have had any experiences with Skim, please let us know and be aware that your annotations might completely mess up when using Skim and Docear.
PDF Readers for Android
We have not tested any PDF readers for Android. Some users reported that RepliGo (3$) allowed reading PDFs and creating annotations in a way that allows Docear to import them. However, RepliGo is discontinued and not available any more in the Android Market. Please, if you have had any experiences with any Android PDF readers, let us know.
Tweaks & Troubleshooting
The user directory
Most of Docear’s important data such as log files, backups, and user and workspace specific settings are stored in
Windows: c:\Users\<windows user name\.docear
Linux: ~/.docear/
Mac: /User/<mac username>/.docear/

You can also open the folder by clicking the “Open User Directory” icon in the “Tools and settings” ribbon.

Log files
Docear is logging all errors. To open the folder containing the log files, chose “Show system log” in the “Help” ribbon. If Docear does not start, you find the log folder in <user directory>\logs\. Please always send your log files when you are reporting an error.

Clear/Delete Settings
If Docear does not work any more as it should, you can try deleting all settings. To do so, select “Open User Directory” in the ribbons, close Docear, and delete the content of the folder that has opened. Alternatively, use a file manager (e.g. Windows Explorer) and delete all files contained in <user directory> (make a backup, just in case). Deleting this folder will not delete your mind-maps, PDF, or references (unless you explicitly stored your mind-maps etc. in the user directory, which you should not do).

When you start Docear the next time, it will behave as freshly installed since all your settings were deleted. To work with your previous projects, follow the instructions on the screen and import your previous project(s)

Options to recover data
Please read the FAQ I lost a mind map. How can I restore/recover it?
Change the settings path / Make Docear portable
By default, Docear stores its settings in a path like c:\Users\<your_windows_username>\.docear\. This means, if you run Docear e.g. from a memory stick, and start Docear on a new computer, Docear can’t find that path and will ask you again for your log-in data, your project home etc. If you want to have a portable Docear, i.e. you want your settings stored on your memory stick, there is a potential solution. Open the “docear.bat” file with a text editor, and add the string “-Dorg.freeplane.userfpdir=.\.

Move (relocate) a project
If you want to relocate a project from one storage location (e.g. c:\my files\) to another location (e.g. c:\dropbox\), do the following:
Open your project home in a file browser (e.g. Windows Explorer). If you don’t remember the home directory, start Docear, do a right click on the corresponding project in the workspace panel, and select “Open Location”:

By selecting “Open Location”, your default file explorer will open your project home, which might look like this:

Next, remove your project from Docear’s workspace, either via the ribbon menu or a right mouse click (don’t close your file explorer):

Note: Removing the project from your workspace panel, does not delete any files.
Next you need to select all files and folders of your project home in your file browser, and move the files and folders to your new project home, e.g. c:\dropbox\share with bob\new paper\.
Then, select “Import project” and in the import screen you select the new location of your project, e.g. c:\dropbox\share with bob\new paper\.
That’s it, you should be able now to use your project in Docear as you did previously. Of course, instead of moving your files, you could also copy them, if you wanted to share your current project with a colleague (or the Docear support team) but the changes that your colleague makes should not affect your original files.
Understanding the configuration files of Docear
If you moved your data to a new computer, if you want to move your PDFs to a new folder, if you renamed some folders on your computer (which, e.g., contains your PDFs or mind-maps), or did some other actions and now Docear is not working any more, the following information might help. However, be aware, if you are not an experienced computer user who knows what XML is and if you have never modified any configuration files with a text editor before, you should probably not read on and let us do the work. Whatever you do: Make a backup of your files before you edit them!
The picture below shows a screenshot of Docear, and some important files opened with a text-editor. You should enlarge the picture (in a new browser window) to understand the following explanations (do a right mouse click in the picture and choose ‘open in a new tab’).

Click to enlarge
The Workspace
In your workspace panel in Docear, you see a list of all your projects. All information that you see there is contained in two files, which are both text files that you can open and edit with any text editor (e.g. Windows Notepad, though we would recommend Notepad++).
1. user.settings
This file defines the projects that are shown in your workspace. If you want to move a project on your hard drive, you need to edit this file. You find it in <user directory>/users/<your docear user name>/user.settings. In the user.settings file you need to define/adjust the project ID and the project home of your projects, e.g.
14738CA52AB1V08PK0OVZVMWDA5GVIV8DC1=file\:/C\:/Users/admin/Docear/projects/test%20project.
Second you need to list all projects that should appear in the workspace panel in the line
org.freeplane.plugin.workspace.mindmapmode.model.projects=<project id 1>, <project id 2>, …,<project id i>
In other words, if you want to move a project on your hard drive, you need to adjust the path of the project and change e.g …file\:/C\:/Users/admin/Docear/projects/test%20project to …file\:/C\:/my new path/test%20project
2. settings.xml
Each project has a settings.xml which is located in <project home>/_data/<project id>/settings.xml. This file contains the id of the project, the project name, and all files that you see in the workspace panel for a specific project (e.g. all files in a project’s library). All links in settings.xml are project relative. This means, the path to e.g. your literature and annotations mind-map is typically
project://<project id>/_data/<project id>/default_files/literature_and_annotations.mm.
If you have changed some paths on your computer, e.g. renamed a folder that contains your mind-maps or PDFs, you need to adjust settings.xml correspondingly, For instance, if you want to change the path of your literature repository, change e.g.
path=”file:/C:/Users/admin/Docear/projects/test%20project/literature_repository“
to
path=”file:/C:/Users/admin/Docear/projects/test%20project/my_new_literature_repository“
If you change the path of your literature repository, it is important that you adjust the path also in the mind-maps (see next section).
Mind-Maps
Your mind-maps are stored as XML files that you can edit with a text editor. It is important that the project ID in a mind-map (see screenshot, first line of the mind-map in the text editor) is the same as the IDs in settings.xml and user.settings. It’s also important that all links to PDF files (and other files) contain the same project ID. For instance, if the first line of a mind-map says
<map version=”docear 1.1″ project=”14738CA52AB1V08PK0OVZVMWDA5GVIV8DC1″ project_last_home=”file:/C:/Users/admin/Docear/projects/test%20project” dcr_id=”1377253696629_575mr2xhasgzy80oz8d2cqhjn”>
then all links in the mind-map must also contain the same project ID
<node TEXT=”ASEO, original paper” ID=”ID_797443631″ CREATED=”1344508031885″ MODIFIED=”1405407742336″ LINK=”project://14738CA52AB1V08PK0OVZVMWDA5GVIV8DC1/literature_repository/Example%20PDFs/Academic%20Search%20Engine%20Optimization%20(ASEO)%20–%20Optimizing%20Scholarly%20Literature%20for%20Google%20Scholar%20and%20Co.pdf”>
If the ID of a project changed (which should not happen), you need to find all old IDs and replace them with the new ID. Similarly, if you copy a mind-map from one project to another project, you need to adjust all project IDs in the copied mind-map.
If you renamed the folder on your hard drive that contains your PDFs, you need to adjust the path in all your mind-maps. Most editors allow a search and replace (pressing CTRL+H opens the search and replace dialog in most editors). Then you need to replace the old path with the nex path. For instance, replace
LINK=”project://14738CA52AB1V08PK0OVZVMWDA5GVIV8DC1/literature_repository/Example%20PDFs/Academic%20Search%20Engine%20Optimization%20(ASEO)%20–%20Optimizing%20Scholarly%20Literature%20for%20Google%20Scholar%20and%20Co.pdf”
with
LINK=”project://14738CA52AB1V08PK0OVZVMWDA5GVIV8DC1/my_new_literature_repository/Some_Example%20PDFs/Academic%20Search%20Engine%20Optimization%20(ASEO)%20–%20Optimizing%20Scholarly%20Literature%20for%20Google%20Scholar%20and%20Co.pdf”
If you have specific questions about adjusting your paths, feel free to ask in the forums.